Friday, September 28, 2012

Savings!


We went shopping with a list and as with most projects, we realized we needed some more stuff! Here are the items we we realized we needed when we got to the store: 
  • A Jig Saw Blade
  • Pencils 
  • Plane Set 
  • Safety Glasses 
  • Packing and Painters Tape 
We ended up not getting the installation kit once we realized what was inside. Instead we found some plastic tile spacers that we more economical (72 for $8 over 48 for $10). And upon my dad's suggestion used a pry bar instead of buying a pull bar. 


Before we headed to the store I looked on line for some printable coupons and possible deals. I found a couple blogs where folks claimed that many Home Depot and Lowes honored competitors coupons. A couple authors claimed that many cashiers and managers didn't always read the coupons fully and you could get lucky and use a 20% off one item coupon to get 20% off your entire purchase! So we headed down to our local H.D. and as it turns out you can use Lowes and Harbor Freight coupons at Home Depot. If you don't know about Harbor Freight you stop reading my blog and go to their website

Here I am standing in line, super excited, that I may get 20% off my purchase! But alas, they actually read the coupon and said I could only get 20% a single item. That didn't stress us out because before our trip to Lowes we headed to the post office for a Change of Address packet (we typically change our address online) If you stop by your local post office they will give you a change of address packet with coupons to Ikea, Pensky, Lowes, Chase, and Verizon! We ended up saving 10% on our entire Home Depot Trip courtesy of Lowes. Then we headed down to Harbor Freight and used that 20% off a single item, used a coupon for a FREE screw driver set, and saved $24.50 between their circular coupons and daily deals. 

I can now sleep easy until the alarm goes off at 5:30 AM...


Wednesday, September 26, 2012

What's in my tool box Wednesday

Me & My Stud Muffin =)
I am so lucky to be married to such a stud-muffin. I am also lucky that he already has almost every tool I'll ever need. So, while I'll be spot lighting some of my favorite and most useful tools in this series, tonight I am sharing a "tool" that will save me many headaches. 

As soon as we got the keys for our apartment, I pulled out the tape measure I keep in my purse and got to work measuring everything in our new place. From the dimensions of each room, to the windows, to the fixtures, I have it all in one place. I can order the fabric for my window treatments, start arranging each room with the furniture we have, and get a better sense of what furniture we still need. Download the Apartment and Furniture Measurement Sheet. It is somewhat specific to our apartment but can be modified as needed. 

I also have been carrying a "look book" with me where I keep paint samples, receipts, and photos of things I find on Pinterest and in magazines that inspire me! 

Au revoir!


Tuesday, September 25, 2012

Shopping Trip Numéro Un

We have a Lowes, Home Depot, and a mom and pop hardware store all within a couple minutes of us! Score! After a trip to Lumber Liquadators turned out fruitless we headed to Lowes. Because, yes, lets build something together. 

(Our shopping cart)

We knew what we needed and were in and out in under 40 minutes and exactly at our budget of $500. We purchased 350 square feet of laminate, a repair pen for the laminate, (haha, I anticipate accidents!) 10 outlet covers, a scraper (to free those french doors from the paint on the windows), lots of utility blade replacements, a pro chalk reel set that I am elated to use (I like straight lines!), a GFI outlet for the kitchen (we have managed to put one in every place we have ever lived- my husband takes safety very seriously), magic erasers, a usb outlet for our bedroom, and a bathroom door knob that locks. 

**Full disclosure I am typically very forward about how much I spend on things, especially when I get a good sale. I wish I had a coupon for this shopping trip BUT I am happy we shopped around and got what we wanted at the best price. Would you like to see the receipt? I will post those if folks are interested in how much we are spending on everything. 

We did a lot of research before buying the floors and learned that we really wanted to lay the underlayment ourselves as opposed to buying the laminate flooring with the underlayment (or padding) attached. We will be laying the floor next weekend, so the laminate will have had an entire week to acclimate to the temperature and humidity of our new place. Laminate flooring is still made from wood and it will expand and contract as the temperature and humidity change. This is very important because if this happens after you lay the flooring you will end up with spaces and crowding. We also read on-line that when installing the underlayment you only put out one row at a time, as opposed to installing the entire floor. Underlayment can rip if you stand on it, depending on the type you are using (I think a little common sense goes a long way here).

The next shopping trip will be underlayment from Home Depot- 50% cheaper than Lowes!! and two utility blades (Lowes didn't have anything of quality that was reasonably priced). We are also going to pick up a laminate floor laying installation kit. The kit contains spacers to leave space around the perimeter, between the flooring and the wall. The kit also contains a "pull bar" for setting the boards closest to the wall, where you don't have room to fit a hammer.

After it's installed we will be buying some quarter round to install at the base of the floor and we need to order some reducers to place in between the rooms. Reducers, a type of transitions, transition floors of varying heights. We need them between the rooms where the floors aren't the same but we also need them to reduce the space under some of our doors!  

We have some friends and family coming to help with the floor. In my brain this is going to be an easy project. We shall see! 

Happy Tuesday Ya'll! 


Sunday, September 23, 2012

Our Blank Canvas (read: we have a lot of work to do)


Living room and dining room


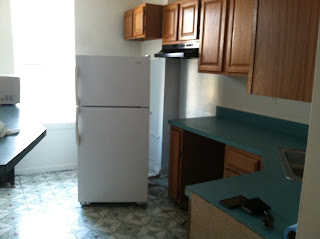
Current state of the kitchen. Small, but I can work with this.


Bathroom needs more loving than I am emotionally prepared to give at this point. 


Guest room, can you feel the hospitality?


Who doesn't love a good set of french doors? Apparently, the previous tenants.  If you were wondering, yes the windows were covered with contact paper and then PAINTED! Please tell me they didn't see this on Pinterest or all hope for Pinterest is lost. 


This closet looks like something out of Beetle Juice (nothing is square and it's black and white). Let me tell you, its going to be a miraculous built-in when we are finished with it!


Master bedroom. Yes Mom, I know the floor looks fine in this picture. Upon closer inspection you will see that it is not wood at all, but a sheet of roll-out linoleum intended to look like wood. Complete with fold marks and random bumps (I pulled a corner up and found a thumb tack, I guess the directions didn't specify to sweep the floor before installation)


Master bedroom, thank goodness for those two big sunny windows 


So, now that I need a glass of wine... 


What's for Dinner?

Have you ever gotten home from the grocery store and realized that you spent lots of money, bought a whole bunch of stuff, and yet have no meal to make for dinner? Or you think of a great meal to make and then need to run out at the last minute to pick up everything you need? Or maybe you get so frustrated with grocery shopping and cooking that you end up eating out all the time? This whole project cost under ten bucks and saves us time and money and frustration.

I found this idea on Pinterest wayyy back when and made this Menu Board. 


Supplies Needed: 
  • Picture Frame (Dollar Tree)
  • Scrap book paper and letters (I actually found a this scrap book/letter set at TJ Max)
  • Clothes Pins (Dollar Tree) 
  • Printer
  • Small cardboard jewelry box
  • Hot glue or rubber cement 
I used two pieces of scrap book paper to line the inside of the frame. And used lettering to write the word "Menu". You could write this out or not even include it.  I glued some strips of decorative paper to each clothes pin and added stickers to indicate the day of the week, but you could use a marker. I then glued the clothes pins into place on the frame and set aside to dry. I cut on long side off of a cardboard jewelry box (I had this light brown one laying around from some cute earrings my sister-in-law gave me). Then very carefully I glued the box to the glass part of the frame. I used a little tape here as well on the inside of the box. While all of this was drying I sat at the computer and typed up some of our favorite and frequent meals. Upload our dinner idea pages here: Dinner Ideas, page 1Dinner Ideas, page 2Dinner Ideas, page 3. As you will see, next to each meal there is a list with the items needed to make the meal. You can print them (I printed them on colored paper and added stickers later) and then cut them in strips so that each strip has two boxes. Fold the strip in half and put glue in the middle. So on the front you will have the meal name and on the back will be the list of things you need to have on hand. I also included an option for "left overs," "eating out," and "prepared food" (we sometimes buy Thai kits that just require we add tofu.  

The little box is used to keep the meal ideas you arn't using this week. 

I love the way this will look hanging in our new kitchen. I used it in Nashville and found it really helpful to plan meals and plan shopping trips. I often planned meals based on what was on sale. I found that we were wasting less, eating out less, and I saved time at the grocery store. 

Do  you have a menu board? How do you plan your shopping trips? 


Thursday, September 20, 2012

Our Home

Bienvenu! 

Sorry! I'm trying to learn French and got excited. Thanks for visiting my blog! I am going to be documenting the work that my husband and I do as we improve our new apartment. Let's just say it has "potential." It is a three bedroom (okay, 2 and a half, but three because we are in Brooklyn) with a formal dining room above a fancy restaurant.

We aren't home owners just yet, which is a good thing since in our two year marriage and before that our two year engagement I have unpacked, decorated, and repacked three homes. This is number four and I plan on getting it right.  I am a big fan of  Follow Me on Pinterest and garage sales, which is convenient since we would like to spend as little as possible on making this apartment our own. We plan on living in Brooklyn and  in this apartment for at least two years, but it needs some tender loving care. 

We have spent most of our adult lives in New York with the exception of the year we lived in Nashville, TN. My plan for this home gets a lot of inspiration from our time there with a New York attitude. I love shabby chic. I love cozy lighting. I am a host at heart, so I plan to make our home into a place where everyone feels welcome. 

Highlights of items I am itching to move in: a Pottery Barn dresser that James and I garbage-picked in New Jersey and then refinished in Nashville (that's a story for a rainy day), a couple of huge hand-me-down mirrors from my mother-in-law, a 4 foot by 8 foot subway map of NYC, a small map of my home town, our beds (I can't wait to dress them- I am obsessed with bedding and pillows!)


Items we plan on spending some money on: a new matching sofa/love seat combo, an office chair for James’ office space, and many DIY projects. I have a feeling the people at our local hardware store will know us by name very soon. 

Current projects on the docket include putting down laminate flooring, redoing the guest closet to make it a built-in for books and picture frames, an accent table for the living room (after we get the couches) and LOTS of window treatments. We are also planning on painting the kitchen cabinets and the couple we are leasing from is putting in new counters and flooring and appliances over the course of the next few months. 

Life is exciting. I am happy. I am blessed to have an amazing husband and family to support us... 


Turning this house... into our home.